
Soil quality is crucial for healthy plants in your garden. Whether you’re growing vegetables, flowers, or trees, knowing your soil’s health is essential. The best way to understand your soil is through soil sampling. In this post, we’ll explore soil sampling tools and how they help improve garden results.
What Is Soil Sampling?
Before diving into the tools, let’s first understand what soil sampling is. Soil sampling is the process of taking small amounts of soil from different areas in your garden to get an overall picture of the soil’s health. You can learn important things about your soil, such as its pH level, nutrient content, and whether it has enough organic material. All this information helps you make decisions on what plants to grow and what fertilizers or amendments you might need.
Now, let’s take a look at the tools that can help you with soil sampling.
1. Soil Probe
The soil probe is one of the most common tools used for taking soil samples. It is a long, narrow tool that you push into the soil to collect a sample. Soil probes are ideal for gardeners because they are easy to use and require very little effort. They come in various sizes, so you can choose one that fits your needs.
A soil probe is typically made from stainless steel or durable plastic. The probe has a handle that helps you grip it comfortably while pushing it into the soil. Once the probe is in the ground, it has a hollow shaft that collects the soil sample. Some probes have a feature that allows the soil to fall out into a collection tube, while others require you to pull the sample out manually.
Advantages of a soil probe:
-
Simple to use and does not require much effort.
-
It helps gather a clean and undisturbed sample.
-
Great for taking samples from deeper parts of the soil.
Disadvantages of a soil probe:
-
It may not be ideal for very rocky or compact soils.
-
Can be difficult to use in small or narrow spaces.
2. Soil Auger
If you need to take samples from deeper or harder-to-reach areas of your garden, a soil auger might be the perfect tool. A soil auger is similar to a drill, but instead of drilling through wood or metal, it drills into the earth. It has a spiral shape that helps it easily twist through the soil, even when it is compact or dense.
Soil augers come in different sizes, from small hand-held models to larger, more heavy-duty versions. The small models are useful for home gardeners, while the larger versions are better suited for professional or agricultural use.
Advantages of a soil auger:
-
Ideal for deep soil samples.
-
Works well in compacted or dense soils.
-
Can collect larger soil samples.
Disadvantages of a soil auger:
-
May require more physical effort to use, especially if the soil is tough.
-
Larger models can be heavy and difficult to handle for beginners.
3. Soil Test Kits
Soil test kits analyze the samples you collect with probes and augers. These kits test key factors like pH levels, nutrients, and organic matter content. Most kits are easy to use, with simple instructions and clear results.
Soil test kits come in different forms, including strips, tubes, and digital meters. The most common ones mix soil with chemicals to change color and show soil properties. Digital meters provide quick, precise readings of pH and moisture levels.
Advantages of a soil test kit:
-
Simple and easy to use.
-
Provides quick results for soil analysis.
-
Great for beginners who want to understand their soil’s needs.
Disadvantages of a soil test kit:
-
May not be as accurate as professional laboratory testing.
-
Some kits may require you to send the soil sample to a lab for detailed analysis.
4. Trowel
A trowel is a small gardening tool with a pointed, scoop-shaped blade. It is used for digging and turning soil in small areas. While it is not specifically designed for soil sampling, it can be a handy tool to use when collecting small samples from garden beds or containers.
Advantages of a trowel:
-
Easy to use for small-scale soil sampling.
-
Inexpensive and widely available.
-
Versatile; can be used for planting as well as sampling.
Disadvantages of a trowel:
-
Not as effective for taking deep or large soil samples.
-
Requires manual effort to gather the sample, which may result in soil disturbance.
5. Shovel
Similar to a trowel, a shovel is a common gardening tool used for digging and moving soil. When it comes to soil sampling, it is often used for larger samples or to take samples from raised beds or garden areas that are too big to use a trowel or probe. A shovel can also be used to break up compacted soil before using a probe or auger.
Advantages of a shovel:
-
Useful for gathering larger samples from big garden areas.
-
Helps loosen compacted soil for easier sampling.
Disadvantages of a shovel:
-
Less precise than specialized soil sampling tools.
-
Can disturb the soil structure, which may not give you the most accurate sample.
6. How to Choose the Right Soil Sampling Tool for Your Garden
Choosing the right soil sampling tool depends on several factors, such as the size of your garden, the type of soil, and how deep you need to go. Here are some things to consider when selecting your tool:
-
Soil Type: If your soil is very compacted or rocky, you may need a tool like a soil auger. A soil probe is great for looser, well-draining soils.
-
Garden Size: For large gardens, you might want to use a soil auger or a shovel to collect multiple samples from different areas. For smaller gardens, a soil probe or trowel should work fine.
-
Depth: If you need to collect deep soil samples, a soil auger or probe is the best choice.
How to Collect Soil Samples Properly
To get the most accurate soil test results, it’s important to collect your samples in the right way. Here’s a simple step-by-step guide to help you collect soil samples for testing:
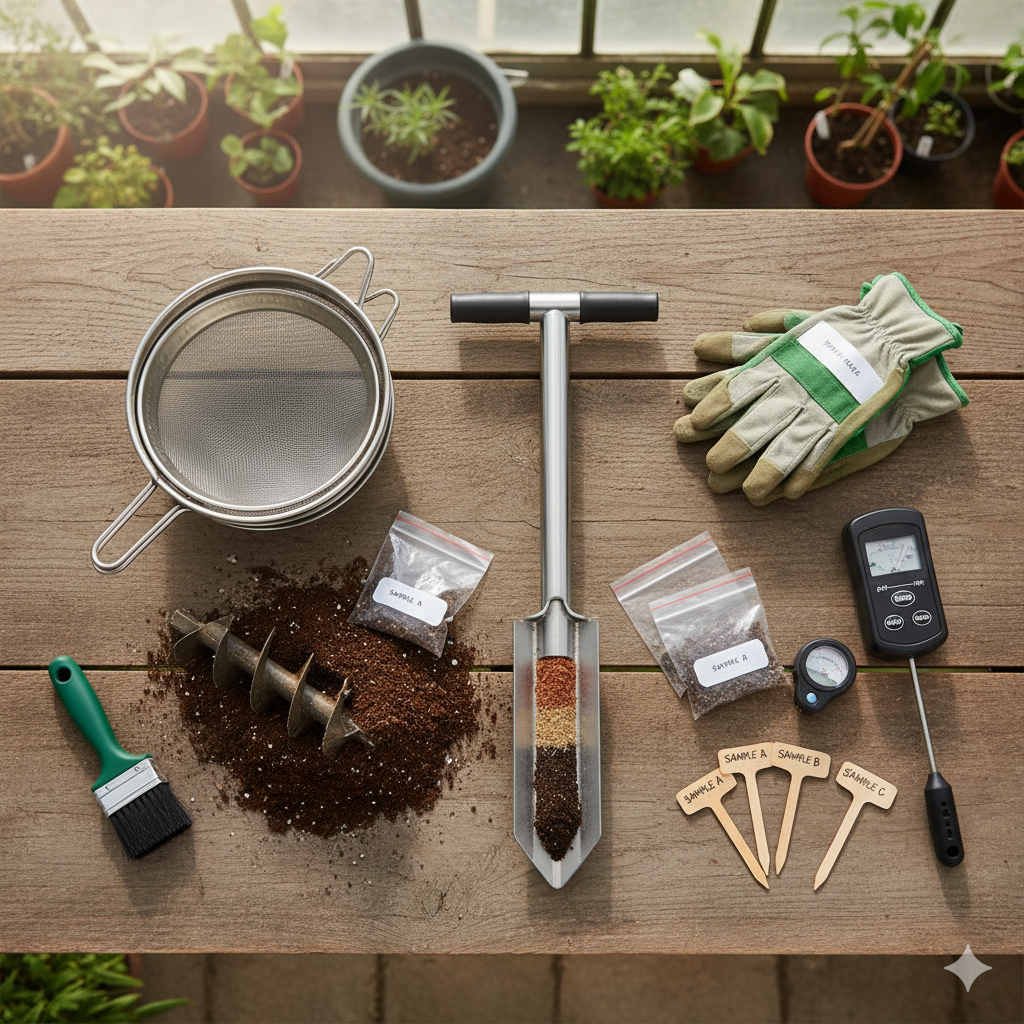
Step 1: Gather the Right Tools
Make sure you have the tools you need for sampling, such as a soil probe, auger, trowel, or shovel. You’ll also need a clean container or bag to store the samples.
Step 2: Choose the Right Areas to Sample
When collecting soil, it’s essential to take samples from several areas of your garden. This ensures that the sample you send for testing represents the overall soil health of your garden. Avoid sampling areas that may be affected by compost piles, fertilizer spills, or other factors that could skew the results.
Step 3: Take Multiple Samples
If you have a large garden, take samples from different spots, at least 8-10 places. For smaller gardens, 4-5 spots should be enough. Make sure you sample at different depths – typically 3-6 inches for surface plants and deeper for shrubs or trees.
Step 4: Mix the Samples Together
Once you’ve gathered soil from different areas, mix it thoroughly in a clean container. This will give you a composite sample that represents your entire garden. Mixing is crucial because it helps balance out any variations in the soil’s composition.
Step 5: Label and Store Your Sample
Label the container or bag with the location and depth of the sample. If you are sending it to a lab for testing, make sure to follow their instructions on how to pack and send the sample.
Step 6: Test the Soil
After collecting your sample, you can either use a home test kit to check the pH, nutrient levels, and organic matter, or send the sample to a professional lab. Some kits can test for more than just pH, such as nitrogen, phosphorus, and potassium levels.
The results from your test will tell you what your soil needs, allowing you to make changes that help your plants grow stronger and healthier.
8. The Importance of Soil pH and Fertilization
Once you get your soil test results, one of the most important things to look at is the pH level. Soil pH is a measure of how acidic or alkaline your soil is. Different plants have different pH preferences. For example, some plants, like blueberries, prefer acidic soil, while others, like lavender, thrive in alkaline soil.
-
Acidic soil (pH below 7): If your soil is too acidic, you may need to add lime to raise the pH.
-
Neutral soil (pH of 7): This is ideal for most plants.
-
Alkaline soil (pH above 7): If your soil is too alkaline, adding sulfur or organic matter can help lower the pH.
Fertilizing your soil is also important after a soil test. The test will show if your soil lacks any key nutrients, such as nitrogen, phosphorus, or potassium. Based on the results, you can choose the right type of fertilizer to add to your soil, whether organic or synthetic.
Adding compost or organic material is another great way to improve soil health. Organic matter helps improve the soil structure, water retention, and nutrient levels.
9. Soil Amendments: What You Need to Know
Soil amendments are materials added to the soil to improve its structure, fertility, and overall health. Once your soil test shows the condition of your soil, you may need to use certain amendments to improve it. Common soil amendments include:
-
Compost: Organic matter that improves soil structure, moisture retention, and nutrient availability.
-
Peat Moss: Helps improve soil structure and moisture retention, especially in sandy or dry soils.
-
Vermiculite and Perlite: Improve aeration and drainage in heavy soils.
-
Lime: Raises the pH of acidic soils.
-
Sulfur: Lowers the pH of alkaline soils.
It’s important to follow the recommendations from your soil test when applying soil amendments to ensure you don’t overuse them. For example, adding too much lime can make your soil too alkaline, which could harm certain plants.
10. How Often Should You Test Your Soil?
Soil testing should be done regularly to keep your garden healthy. Test your soil every year or every two to three years, depending on your garden size and plant type.
If your plants show signs like stunted growth, yellow leaves, or fewer flowers, it’s time to test the soil. These issues may signal soil imbalance, and a soil test can help you fix the problem early.
Soil Testing Tools Are Key to Successful Gardening
Soil sampling and testing are key to improving your garden’s health. Understanding your soil helps you make better decisions on what to plant, when to plant, and how to care for your garden.
With tools like a soil probe, auger, or test kit, you can easily collect soil samples and get valuable insights into your garden’s needs. Always follow the recommendations from your soil test for the best results. Healthy soil equals healthy plants.
FAQs
1. How often should I sample my garden soil?
It is recommended to sample your garden soil at least once a year, preferably in the spring or fall. This allows you to monitor the soil’s condition and make necessary adjustments for the next growing season.
2. Can I reuse soil samples for testing?
No, each soil sample should be unique and taken from a different area of your garden. Reusing samples can lead to inaccurate results because different areas may have different soil conditions.
3. Can I test my soil without a kit?
Yes, you can collect soil samples and send them to a professional lab for analysis. However, using a soil test kit at home is more affordable and easier for beginners.
4. What do I do if my soil is too acidic or alkaline?
If your soil is too acidic, you can add lime to raise the pH. If it’s too alkaline, adding sulfur can help lower the pH. Be sure to follow the recommendations from your soil test results to avoid over-correcting the pH.
-