
A heavy-duty wall storage system is essential for professional gardeners who want a clean, safe, and organized workspace. These systems allow you to hang long-handled tools, store heavy soil bags on shelves, and organize smaller tools and accessories in labeled bins. By planning, installing, and maintaining your storage system correctly, you can protect your tools, save time, and keep your garden area tidy.
“I organize my tools into hand tools, power tools, watering tools, garden accessories, and more. This keeps my garden tidy and saves me time.”
Why Heavy-Duty Storage Matters
Gardening tools and equipment can quickly clutter your shed or workspace. Without proper storage:
-
Tools are easily damaged when left on the floor or leaning against walls.
-
Heavy soil bags, power tools, and large equipment can cause accidents if not properly secured.
-
Searching for a specific tool takes time and slows down gardening work.
-
Children or pets can accidentally get hurt by sharp or falling tools.
A well-planned, heavy-duty wall system solves these problems by keeping tools accessible, protected, and your workspace safe.
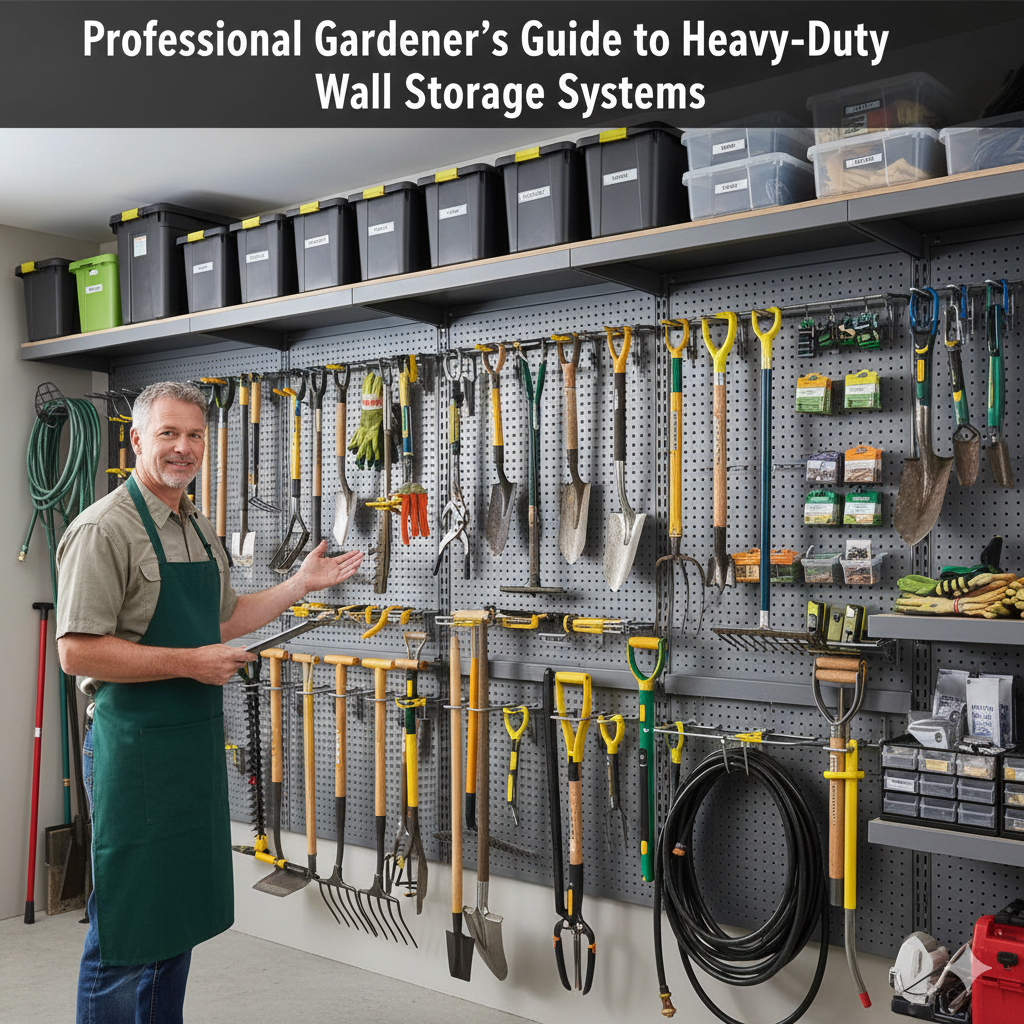
Features of Professional-Grade Wall Storage Systems
Professional wall storage systems are built for durability, flexibility, and long-term use. Here are the main features:
1. High Weight Capacity
-
Can hold a total weight of 500 lbs or more.
-
Hooks and shelves support multiple heavy tools securely.
-
Prevents bending, breaking, or falling items.
2. Durable Materials
-
Industrial-grade steel, aluminum, or treated plastic resists rust and moisture.
-
Can handle temperature changes and repeated use without damage.
3. Modularity and Adjustability
-
Hooks, shelves, and bins can be repositioned or expanded as needed.
-
Track or rail systems with locking pins make adjustments simple.
4. Versatile Components
-
Wall Panels/Slatwalls: Base for mounting all storage accessories.
-
Heavy-Duty Hooks: Ideal for long-handled tools like shovels, rakes, and hoes.
-
Shelves: Hold heavy items like soil bags, pots, or power tools.
-
Bins/Totes: Store hand tools, gloves, and seeds; clear bins improve visibility.
-
Lockable Cabinets: Keep chemicals or sharp tools secure.
Optional upgrades: magnetic strips for small metal tools, overhead racks for seasonal equipment, and rolling carts for portable storage.
Planning Your Storage System
Before installing a wall system, planning is key to efficiency and safety.
1. Assess and Declutter
-
Take a full inventory of all tools and garden supplies.
-
Separate items into categories:
-
Long-handled tools
-
Heavy items
-
Small hand tools
-
Chemicals or hazardous materials
-
-
Discard or donate broken, redundant, or rarely used items.
2. Design Functional Zones
Dividing the wall into zones helps you locate tools quickly:
-
Zone A — Long-Handled Tools: Hang rakes, shovels, hoes vertically on hooks.
-
Zone B — Heavy Items: Place soil bags, pots, and medium-weight equipment on shelves.
-
Zone C — Small Tools & Accessories: Use labeled bins for gloves, seeds, and hand tools.
-
Zone D — Hazardous Tools/Chemicals: Store in lockable cabinets or high-mounted hooks.
3. Prioritize Accessibility
-
Keep frequently used tools at waist or eye level.
-
Store seasonal or rarely used tools on upper racks or overhead storage.
-
Keep floors clear to reduce tripping hazards and improve movement in the workspace.
Installing Your Wall Storage System
Correct installation ensures safety and longevity.
Step 1: Mount Panels or Rails
-
Secure panels or rails directly into wall studs or solid walls.
-
Use heavy-duty screws or bolts according to the manufacturer’s instructions.
Step 2: Distribute Weight Properly
-
Lower Level: Heavy tools and soil bags.
-
Middle Level: Medium-weight items like hand tools or smaller equipment.
-
Upper Level: Light items or seasonal tools.
Step 3: Organize Tools Logically
-
Group similar tools together (e.g., digging tools separate from pruning tools).
-
Use loop hooks for bulky or awkward items like hoses or buckets.
-
Small tools go into labeled bins for easy access.
Maintenance Tips
Regular upkeep keeps the system functional and safe:
-
Wipe down hooks, shelves, and tools to prevent rust.
-
Inspect hooks, fasteners, and shelves every 3–6 months.
-
Clean and dry tools before storing.
-
Avoid exceeding weight limits to prevent accidents or damage.
Optional Upgrades
Enhance your system with these additions:
-
Magnetic Strips: Keep pruners, shears, and small metal tools within reach.
-
Overhead Racks: Store seasonal or large tools that are rarely used.
-
Rolling Carts: Move tools easily around the garden.
-
Clear Labeled Bins: Gloves, seeds, and small accessories remain visible.
-
Lockable Cabinets: Secure chemicals or sharp tools away from children.
Benefits of a Heavy-Duty Wall Storage System
Using a professional wall system offers several advantages:
-
Saves Space: Frees up the floor for movement or additional equipment.
-
Improves Visibility: Makes it easier to find tools quickly.
-
Protects Tools: Keeps them dry, rust-free, and in good condition.
-
Enhances Safety: Reduces trips, falls, and accidents with sharp or heavy items.
-
Adapts Easily: You can add hooks, shelves, or bins as your garden collection grows.
Sample Setup Plan
Here’s a step-by-step approach to set up your wall storage system:
-
Clear the area and sort tools into categories.
-
Mount wall panels or rails securely into studs or solid walls.
-
Assign zones for different tool types: long-handled tools, heavy items, small accessories, hazardous items.
-
Install hooks, shelves, and bins in their designated zones.
-
Label bins and shelves for easy identification.
-
Place heavy tools and soil bags on lower levels, medium items in the middle, and light items higher.
-
Store tools immediately after use, cleaning and drying them first.
-
Inspect the system every few months for loose hooks or signs of wear.
Quick Visual Reference
| Zone | Item Type | Storage Method | Level |
|---|---|---|---|
| A | Long-handled tools | Hooks | Lower/Mid |
| B | Heavy items | Shelves | Lower |
| C | Small tools & accessories | Bins | Mid/High |
| D | Chemicals & sharp tools | Lockable cabinets | High |
✅ Tip: Label everything. It saves time and keeps your workspace organized.
Conclusion
A heavy-duty wall storage system makes gardening tools organized, accessible, and safe. Proper planning, installation, and regular maintenance ensure the system lasts for years. This setup not only protects your tools but also makes gardening tasks faster, easier, and more enjoyable.
FAQs
1. What tools can I store on a wall system?
You can store long-handled tools, heavy equipment, hand tools, gloves, seeds, and chemicals in lockable cabinets.
2. How do I prevent tools from falling?
Mount hooks and shelves securely into studs or solid walls, distribute heavy items lower, and never exceed weight limits.
3. Can I install a system in a small shed?
Yes, modular wall systems are scalable. One or two walls can store most tools efficiently.
4. How often should I maintain the system?
Check hooks, shelves, and fasteners every 3–6 months. Clean and dry tools before storing to prevent rust and damage.